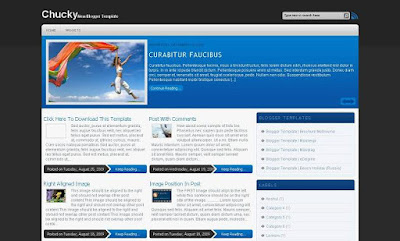
As the special feature in this for you is the featured galley which many readers like to use and a automate shortening of post section on home page which is the speciality of wordpress themes.So what you waiting for, just have an demo and download it and start using it as soon as you can.
Snapshot Of The Chucky Template

Now if you think this template doesn't satisfy your dream design,then check out my last two designs for sure as may like it for sure.
1)The Latest Blogger Template
2)Mainam Blogger Template
Now Updated To Latest Blogger Features
1.Pages Features Working
2.Comment Avatars Working
3.Share Buttons Working
Hacks Installed In Chucky Template
- Search Box Installed
- Horizontal Navigational Menu Links
- Automatic Read More Hack With Thumbnail
- Swap Title Hack For Blogger
- Embed Comment Form
- Hidden Navbar Layout
- How Highlight Authors Comments In Blogger Blogs
- Numbering Of Blogger Comments
Features Of The Template
- Fixed Width Template
- Two Column Blogger Template
- Right Sidebar
- Beautiful Comment System
- Featured Content Gallery
- Top Menu Ready As Linklist
- Search Box Ready
- Rss Button Ready
- Compatible With Mozilla, Chrome and IE7
I request you to Please Back Up your blogger template and all blogger widgets to your desktop or just copy paste all sidebar widgets codes to notepad and save to your desktop for further use in new template.
When you will Download This Template you will get an installation guide downloaded with template but i would like to tell about installation here too.
Chucky Template installation
1) Header Image:-Just upload your header image from header widget inside the blogger layout.That is widget at top left of page elements,by hitting Edit Button.If you don’t wanna use image,you can use text also.
2) Menu Links:-To add the menu links, just keep on publishing your blogger pages and links will be added there automatically.
3) Read More Hack With Thumbnail:-As read more hack with thumbnail is installed.And it display image of size i assigned on homepage.If you want to change it or remove it or any alterations in it,you can read and modify it from here.
http://www.anshuldudeja.com/2009/05/automatic-read-more-hack-for-blogger.html
4)Using Featured Content:-
a) You will see the Featured Content widget in the layout above in picture as i shown where it is.
b) Just Add the Following Content in the way to make it work.
<div id="featured-post-wrap" class="clearfix">
<script type="text/javascript">
jQuery(document).ready(function() {
jQuery('#featured-post').cycle({
fx: 'fade',
speed: 'fast',
timeout: 6000,
pause:2,
next: '#featured-next',
prev: '#featured-prev'
});
})
</script>
<div id="featured-post">
<div class="featured-item">
<img alt="Image Name" width="304" src="Link of the Image" class="featured-thumb" height="190"/>
<div class="post clearfix">
<p class="date-post">Date of the Post </p>
<h2 class="title"><a href="Link of the Post" title="Title of the post">Title of the post.</a></h2>
<div class="entry">
Post Content Or Description
</div>
<a class="read-more" href="Link of the Post" title="Continue Reading...">Continue Reading...</a>
</div>
</div>
</div><!-- /featured-post -->
<a id="featured-prev">prev</a>
<a id="featured-next">next</a>
</div><!-- /featured-post-wrap -->
c) You have to just change the things highlighted in red color.
d) If you want to add more post then Just before below code
</div><!-- /featured-post -->
add this code :
<div class="featured-item">
<img alt="Image Name" width="304" src="Link of the Image" class="featured-thumb" height="190"/>
<div class="post clearfix">
<p class="date-post">Date of the Post </p>
<h2 class="title"><a href="Link of the Post" title="Title of the post">Title of the post.</a></h2>
<div class="entry">
Post Content Or Description
</div>
<a class="read-more" href="Link of the Post" title="Continue Reading...">Continue Reading...</a>
</div>
</div>
e) Repeat The step and Get as much post you want.
I have seen many having problem in adding this slider.So i am ading one more way for you to add it correctly.Just open this notepad file and copy codes from it and paste it in the widget of slider and save it.These are codes which i am using in demo blog.If it works perfectly then just edit content in that codes in the way i have told above.
Donate If You Like The Work
If You Really liked my work and want encourage me to convert more Proffessional wordpress themes to blogger templates for Free, Then please help us by donating something you feel for this design by using paypal button in my sidebar.
No comments:
Post a Comment