Showing posts with label fashion DIY. Show all posts

Friday, February 24, 2012

Peacock feather collar for the masquerade ball DIY

diy, feathers diy,feather collar,peacock feather collar, peter pan collar diy, carnival costume, costume, masquerade ball, jewelry diy, fashion diy,do it yourself

A masquerade ball is the right place to show a fancy ball dress or a statement accessory and you even risk to pass unoticed. Excess and fun are the main characteristics of Carnival. How can we transform the spirit of  this crazy feast day into something wearable? For me feathers and bright colors are the best choice. This is how the idea of this collar is born. Match it with a multi color eye make up and have fun. See how to make the collar after the jump.

Un ballo in maschera è l'occasione adatta per indossare un vestito o un accessorio vistoso rischiando anche di non essere notate. Eccesso e divertimento sono le caratteristiche principali del Carnevale. Come possiamo trasformare lo spirito della festa più pazza dell'anno in un capo indossabile? Piume e colori vivaci sono un ottima scelta ed è così che nasce l'idea di questa collana da abbinare ad un make up rigorosamente multicolor.


supply: a feather boa and some peacock feathers, a piece of black cotton and glue(lots of it)
vi serviranno: un boa di piume, qualche piuma di pavone, un ritaglio di cotone e colla
I cut the pattern twice, I sewed two pieces together then I turned the collar inside out
Ritagliate 2 volte il modello, cucite i due pezzi di stoffa uno sull'altro e poi mettete il colletto a dritto

I took off some feathers from the boa then I glued them onto the collar
Staccate le piume dal boa e incollatele sul colletto
this is how the collar looks covered by feathers
ecco il colletto coperto di piume
I added peacock feathers and then more black feathers for extra volume and fluffiness
Incollate anche le piume di pavone e continuate ad incollare piume per aggiungere volume alla costruzione 

Thursday, February 23, 2012

DIY idea: Acne leather cut out skirt

acne,diy, fashion DIY,  skirt diy, diy leather skirt,cut out skirt, no sew, refashion, spring 2012,leather diy,acne s/s 2012
Acne spring 2012

acne,diy, fashion DIY,  skirt diy, diy leather skirt,cut out skirt, no sew, refashion, spring 2012,leather diy,acne s/s 2012
Acne spring 2012
It's an unusual leather skirt the one designed by Acne for spring summer 2012.  It can be made just cutting out star shapes from your leather skirt and no sewing is required. That's why leather is a fantastic diy material: it does not rip off!

E' una gonna originale quella disegnata da Acne per la primavera 2012. Può essere realizzata ritagliando delle stelle dalla vostra gonna in pelle. Non sarà necessario cucire nulla perchè la pelle non sfila e questo la rende una perfetta materia prima per i nostri fashion diy.

Tuesday, February 21, 2012

Marni for H&M inspired necklace DIY

sofia coppola,marni for H M, marni, marni necklace diy, diy, jewelry diy,fashion DIY, h m designer collaborationsofia coppola,marni for H M, marni, marni necklace diy, diy, jewelry diy,fashion DIY, h m designer collaboration

sofia coppola,marni for H M, marni, marni necklace diy, diy, jewelry diy,fashion DIY, h m designer collaboration
Marni for H&M on Vogue Russia

Another H&M designer collaboration wll hit the stores on 8th of March. It's the turn of Marni a sophisticated luxury italian brand. H&M abandons the big names of the fashion industry known by the masses and chooses an intellectual fashion house. We could say that H&M goes radical chic in fact it also picks Sofia Coppola to direct the tv commercial. Marni is known for prints and patterns with a vintage feel and for big statement jewels. The collection designed for H&M has Marni written all over it. It's tribal, vintage and also bohemian and bauhaus. The full lookbook has been disclosed only a few days ago.
See the full Marni for H&M lookbook here. Will you queue outside H&M stores?

Now let's get back to today's diy project. I think that  jewelry is the best part of  this Marni collection.   Every piece looks like a 70's jewel and it's either in wood or in plastic. The plastic leaves necklace you see above are my favorites.  I can make a similar one with just a lighter and an empty bottle. See how I made it.

H&M continua la sua collaborazione con i grandi brand e l'8 marzo sarà il turno di Marni. H&M abbandona i grandi nomi del fashion industry conosciuti dal grande pubblico e sceglie invece un brand di nicchia e più intellettuale. Potremmo dire che quella del colosso svedese sia una scelta radical chic sottolineata anche dal nome di Sofia Coppola scelta per la regia dello spot. Marni è conosciuto per le sue stampe dal sapore vintage e i grandi gioielli e la collezione disegnata per H&M rispetta il dna della maison. Si potrebbe definire una collezione dal sapore vintage con influenze tribali,  sia bohemien che bauhaus. Il lookbook completo è stato svelato da poco, cliccate qui per vederlo. La collezione sarà disponibile solo in negozi selezionati. Che dite? Farete la fila fuori?

Ma torniamo alla collana diy di oggi. A mio parere i gioielli sono la parte migliore di questa collaborazione. Sono tutti molto vistosi  in legno o in plastica, in particolare la collana in foglie arancioni qui in alto è la mia preferita. Possiamo realizzarne una simile con una bottiglia in plastica e un accendino. Vediamo come.


A colored bottle
I didn't care what was inside the bottle, I picked this orange juice only for the color of the bottle (is it weird?).
By the way get a plastic bottle

Scegliete una bottiglia di plastica
empty it and cut it

vuotatela e tagliatela
Cut out a leaf shape and get a lighter

Ritagliate una foglia e prendete un accendino


Now this is the fun part: warm up the plastic leaf with the lighter. Keep it a little far from it. You'll see the plastic leaf bend and become tridimensional. It will look much more like a real leaf. These 3d leaves will add volume to the statament necklace.

Ecco la parte divertente: scaldate la foglia con l'accendino mantenendolo ad una certa distanza. Vedrete la plastica piegarsi e assumere un aspetto tridimensionale che servirà a dare volume alla collana. In più otterrete una foglia molto realistica.
here's the first leaf
ecco come appare la prima foglia
Cut the bottle in pieces
Ora ritagliate tutta la bottiglia
Curl all the pieces
e piegate tutte le foglie
Insert one leaf after another
Infilatele una dietro l'altra in un filo
these are three layers 
qui in alto tre strati sovrapposti di foglie
I then added a couple of beads and then I finished the necklace with  thread and crochet using the romanian macramè technique I used in the Stella MCartney diy dress.

Ho aggiunto un paio di perline ed ho ultimato la collana con  filo e l'uncinetto realizzando la fettuccia rumena che già ho utilizzato nel vestito diy di Stella MCartney.

Sunday, February 19, 2012

Stella MCartney inspired cut out dress with wavy hem DIY

stella mccartney dress,dress diy,diy,fashion diy,how to,cut out dress,wavy hem,spring 2012stella mccartney dress,dress diy,diy,fashion diy,how to,cut out dress,wavy hem,spring 2012
stella mccartney dress,dress diy,diy,fashion diy,how to,cut out dress,wavy hem,spring 2012

Yesterday we talked about wavy hems and how they are trending this spring. I really appreciated how Stella MCartney incorporated curled hems in her spring 2012 collection. Today I'll show you how to diy a similar dress cutting out one you already own. I will also show you a crochet technique to make a cord I used to decorate the dress: it's called the romanian cord (or european macramè).

Start with a long sleeve dress. I made my dress from scratch because I had a very cute piece of fabric that was perfect for this project. The project is all about cutting out so a dress you already own will be fine.
Ready to start? Follow me after the jump.


stella mccartney dress,dress diy,diy,fashion diy,how to,cut out dress,wavy hem,spring 2012

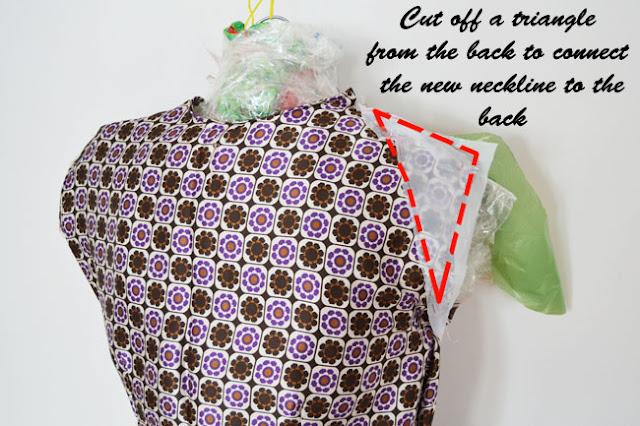
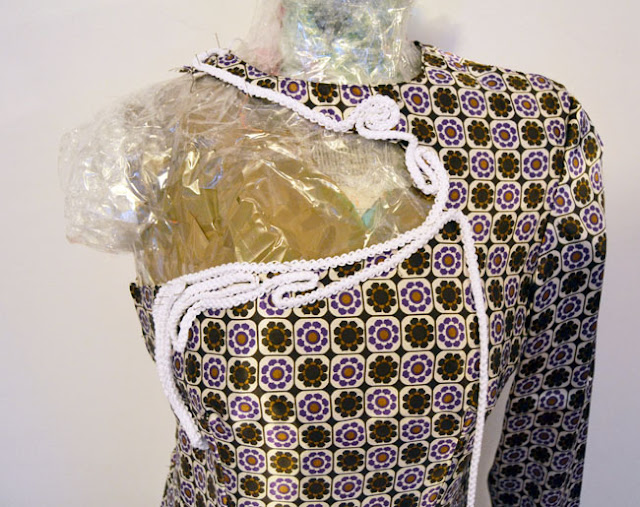
I put my dress on my diy dress form (or just wear the dress). Highlighted in the pic you can see the part of the fabric you have to cut it out. Start cutting on the shoulders, 1 inch far from the neckline, cut off the cleavage untill the armhole. Also cut off one sleeve.

stella mccartney dress,dress diy,diy,fashion diy,how to,cut out dress,wavy hem,spring 2012
This is how the neckline looks once cut
stella mccartney dress,dress diy,diy,fashion diy,how to,cut out dress,wavy hem,spring 2012

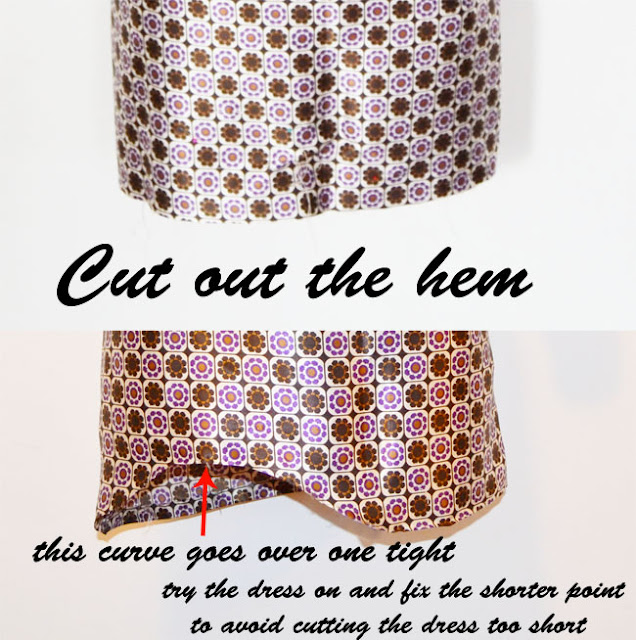
Now let's cut the wavy hem.

stella mccartney dress,dress diy,diy,fashion diy,how to,cut out dress,wavy hem,spring 2012

stella mccartney dress,dress diy,diy,fashion diy,how to,cut out dress,wavy hem,spring 2012
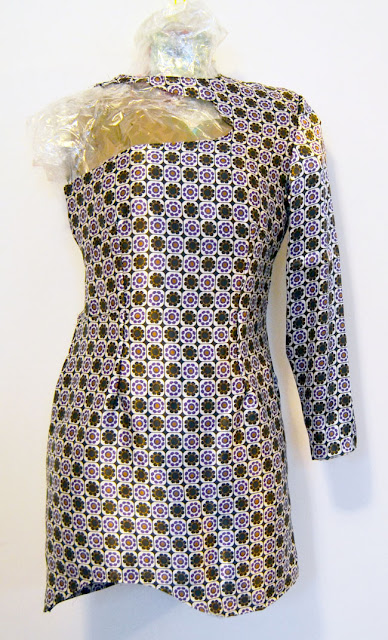
This is how the dress should look once cut
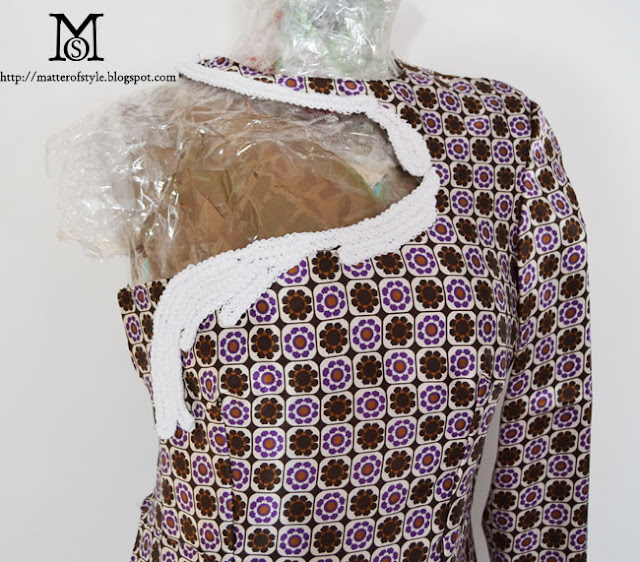
 Now let's decorate it! Stella MCartney's dress is heavy embroidered along the neckline and along the hem. To imitate this embroidery I made a few meters of crochet cord (but you can also buy a cord or a cute trim). This cord is called romanian cord (or european macramè) and it's easy to do if you know the basics of crochet, click on this link to learn how to do the romanian cord.

stella mccartney dress,dress diy,diy,fashion diy,how to,cut out dress,wavy hem,spring 2012
this is how the romanian cord looks like
stella mccartney dress,dress diy,diy,fashion diy,how to,cut out dress,wavy hem,spring 2012
I pinned the cord over the dress then I sewed it
stella mccartney dress,dress diy,diy,fashion diy,how to,cut out dress,wavy hem,spring 2012
And this is how the embroidery looks like when done.

stella mccartney dress,dress diy,diy,fashion diy,how to,cut out dress,wavy hem,spring 2012

And this is how the dress looks once finished.
I hope you liked this tutorial, happy Sunday!
See other diy cloths here.

Saturday, February 18, 2012

DIY idea: wavy hems

wavy hems, asymmetric hems, rounded hem skirt, rounded hem skirt, spring 2012, runway looks,diy, diy inspiration,fashion diywavy hems, asymmetric hems, rounded hem skirt, rounded hem skirt, spring 2012, runway looks,diy, diy inspiration,fashion diywavy hems, asymmetric hems, rounded hem skirt, rounded hem skirt, spring 2012, runway looks,diy, diy inspiration,fashion diy

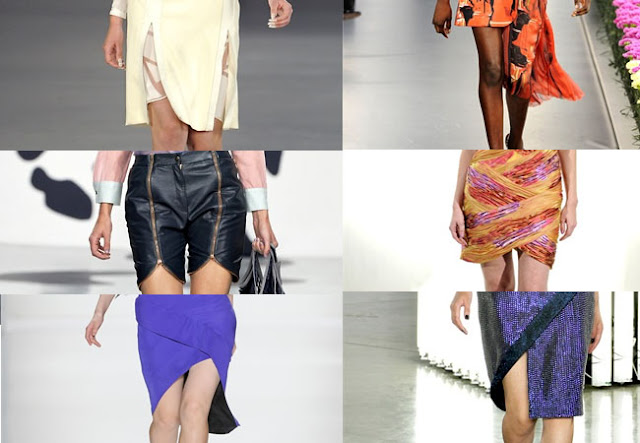
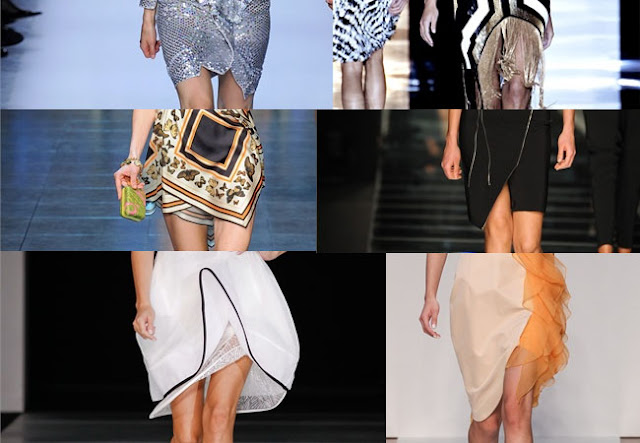
Have you learned how to make a perfect straight hem? Well done but now forget about it. Spring hems are wavy,asymmetrical,shorter on one side more than another. Taking spring 2012 runways looks as inspiration we can have fun cutting out wavy hems from skirts and dresses.
Start giving some movement to a skirt hem having a look at this wrap skirt with rounded hem diy tutorial 

Avete imparato a realizzare un orlo perfettamente dritto? Ottimo lavoro ma ora dimenticatelo. Gli orli primaverili sono ondulati, asimmetrici, più lunghi da un lato. Prendendo spunto dalle sfilate primaverili divertiamoci a ritagliare orli ondulati su gonne ed abiti. Cominciate a dare un po' di movimento all'orlo della vostra gonna dando un'occhiata al tutorial per realizzare una gonna a portafoglio con l'orlo arrotondato.

Friday, February 17, 2012

Metal cap toe shoes DIY

vuitton spring 2012,vuitton inspired,metal toe cap shoes,metal tip shoes, metal toe cap shoes diy,diy,fashiojn diy,shoes diy
metal toe cap shoes diy

vuitton spring 2012,vuitton inspired,metal toe cap shoes,metal tip shoes, metal toe cap shoes diy,diy,fashiojn diy,shoes diy
Vuitton spring 2012 toe cap shoes
vuitton spring 2012,vuitton inspired,metal toe cap shoes,metal tip shoes, metal toe cap shoes diy,diy,fashiojn diy,shoes diy


Shiny and metallic, two adjectives that define everything cool right now. Today I used again the mirror paper that was useful to make the Vuitton inspired metal peter pan collar to bring these shoes back on trend. I bought these shoes a few years ago along with a matching bag (with crocodile embossing my weakness) and apparently pastel colors were as trendy as today. I just cut off a piece of mirror paper and glued it onto the shoes. I think that pointy toes will give the better result on this project because the mirror paper is quite stiff and can't be bended on rounded surfaces. The toe cap is not the only detail that can be made. You can also cut different shapes and decorate the heel for example, unleash your creativity.

Browse other diy shoes here

Luccicante e metallizzato: due aggettivi che ben si adattano alla moda primaverile illuminata di bagliori sci-fi.
Oggi ho utilizzato la carta a specchio (che già si era dimostrata utile per realizzare il colletto in metallo di Vuitton) per riportare nel presente delle scarpe acquistate qualche anno fa quando apparentemente i colori pastello erano di moda come oggi. Ho ritagliato un pezzetto di carta specchio e l'ho incollata sulla punta della scarpa. I migliori risultati li potrete ottenere con delle scarpe a punta poichè la carta specchio è abbastanza rigida e non può essere piegata su delle superfici rotonde. Ma la punta non è il solo dettaglio che potrete decorare. Ritagliando altre forme si possono decorare il tacco o il retro della scarpa. Insomma sbizzarritevi.
Per altre scarpe fai da te cliccate qui

Tuesday, February 14, 2012

DIY idea: Safety pins necklace

Mark Fast


We can call this the istant statement necklace. It can be made pulling four rows of safety pins into a thread. Nice, isn't it?

Potremmo chiamarla la collana istantanea. Si può imitare infilando quattro file di spille da balia  in un filo. Veloce e scenica.

Friday, February 10, 2012

Valentine's day Love shoes DIY with glitter hearts

gift ideas for valentine's day, valentine's day, valentine's day diy, diy shoes, shoes diy, heart shoes, glitter shoes, diy glitter shoes, glitter heart diy, diy, MY DIY, fashion DIY,
your Valentine's day shoes
DIY supply: glitter - glue- brush

Glitter shoes are an irresistible fashion DIY, it's easy to do and the result is awesome. Please raise the hand everyone who has glittered his shoes this year.  Nobody can ignore a pair of sparkly feet and as the Paolo Nutini song says "I put some new shoes on and suddently everything's right", we all want new shoes. Is there anything better than free shopping in your closet? 
Today DIY is about Valentine's day shoes. Grab your pair of black pumps, a brush, glue (diyer best friend) and a pot of glitters. 
  1. Dip the brush into the glue
  2. Draw an heart shape on the back of your heels with the brush (trace the shape with chalk to be accurate)
  3. Fill the shape with glue
  4. pour the glitters
  5. Let it dry
  6. spray a sealant on your hearts
If you liked these shoes, have a look at another pair of DIY glittered pumps
or see all DIY shoes

Se una volta la porporina era esclusivo appannaggio dei centrotavola natalizi, oggi la tentazione di illuminare le nostre scarpe con i glitter è diventata irresistibile. Alzi la mano chiunque ha realizzato un paio di scarpette luccicanti quest'anno. Un diy semplice da realizzare con un risultato veramente appariscente.
San Valentino è vicino, realizzate un paio di scarpe a tema velocemente seguendo questi step.
Avete bisogno di:  scarpe, colla vinilica, glitter, spray fissante per i colori acrilici, un pennello
  1. intingete il pennello nella colla
  2. disegnate con il pennello imbevuto di colla la forma di un cuore sul retro del tacco (per una maggiore precisione tracciate prima la forma con un gessetto)
  3. riempite di colla il cuore
  4. versateci sopra i glitter
  5. lasciate asciugare
  6. spruzzate un fissante
Se vi sono piaciute queste scarpe date un'occhiata ad un altro paio di scarpe glitterate
oppure guardate tutte le scarpe fai da te

Tuesday, February 7, 2012

The cape coat DIY + free pattern


cloth diy, diy, cape coat pattern, free pattern, autumn winter 2011, dogtooth, cape coat diy, fashion DIY

cloth diy, diy, cape coat pattern, free pattern, autumn winter 2011, dogtooth, cape coat diy, fashion DIY
bag by Carpisa similar one: black croc bag by Miss Selfridge

I found a way to join two winter trends: the cape coat and the dogtooth pattern. I found this grey and black dogtooth fabric and I decided to give it some character adding a few torquoise accents. As you can see intricate patterns often look good with bright colors. If you like this cape you can download the pattern, I digitalized the one I made especially for you. Believe it or not you'll only need to sew the shoulders.

Ho trovato un modo di coniugare due trend invernali: la mantella e il pied de poule. Per realizzare questa mantella ho utilizzato una stoffa grigia e nera e ho deciso di sottolineare alcuni dettagli con del pannolence turchese. Come potete notare le stampe vengono spesso valorizzate dall'accostamento con i colori vivaci. Ho digitalizzato per voi il modello che ho realizzato e potrete salvarlo sul vostro computer.


cloth diy, diy, cape coat pattern, free pattern, autumn winter 2011, dogtooth, cape coat diy, fashion DIY
find similar boots here
cloth diy, diy, cape coat pattern, free pattern, autumn winter 2011, dogtooth, cape coat diy, fashion DIY
I added a torquoise lining too.
I wore a blue silk scarf, you can find a similar one here

cloth diy, diy, cape coat pattern, free pattern, autumn winter 2011, dogtooth, cape coat diy, fashion DIY
Download the cape coat free pattern and print it
The pattern is one half of the cape.
Fold the fabric in half and pin the pattern on.

Il modello riproduce metà della mantella

cloth diy, diy, cape coat pattern, free pattern, autumn winter 2011, dogtooth, cape coat diy, fashion DIY
how the shoulder look once sewed
cloth diy, diy, cape coat pattern, free pattern, autumn winter 2011, dogtooth, cape coat diy, fashion DIY
I also added a corean collar