Showing posts with label tutorial. Show all posts

Sunday, February 19, 2012

Stella MCartney inspired cut out dress with wavy hem DIY

stella mccartney dress,dress diy,diy,fashion diy,how to,cut out dress,wavy hem,spring 2012stella mccartney dress,dress diy,diy,fashion diy,how to,cut out dress,wavy hem,spring 2012
stella mccartney dress,dress diy,diy,fashion diy,how to,cut out dress,wavy hem,spring 2012

Yesterday we talked about wavy hems and how they are trending this spring. I really appreciated how Stella MCartney incorporated curled hems in her spring 2012 collection. Today I'll show you how to diy a similar dress cutting out one you already own. I will also show you a crochet technique to make a cord I used to decorate the dress: it's called the romanian cord (or european macramè).

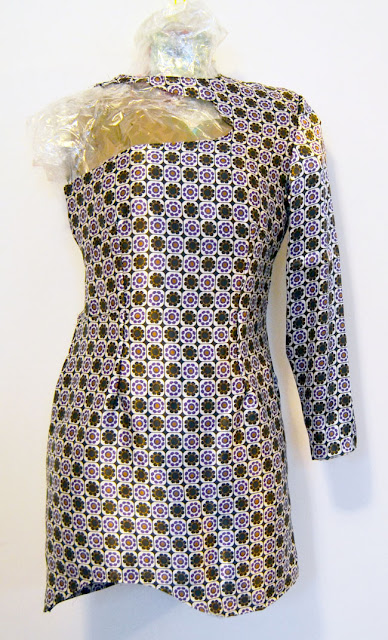
Start with a long sleeve dress. I made my dress from scratch because I had a very cute piece of fabric that was perfect for this project. The project is all about cutting out so a dress you already own will be fine.
Ready to start? Follow me after the jump.


stella mccartney dress,dress diy,diy,fashion diy,how to,cut out dress,wavy hem,spring 2012

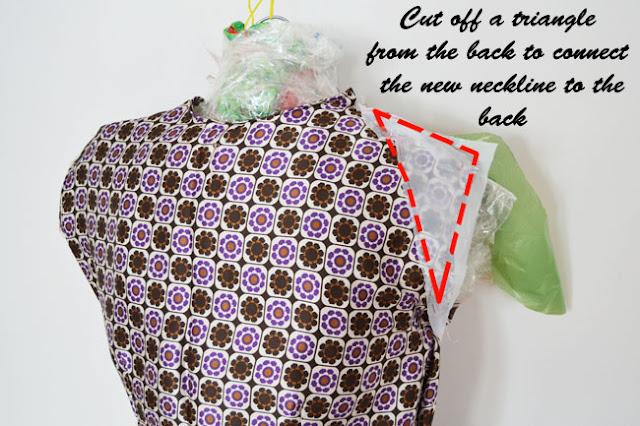
I put my dress on my diy dress form (or just wear the dress). Highlighted in the pic you can see the part of the fabric you have to cut it out. Start cutting on the shoulders, 1 inch far from the neckline, cut off the cleavage untill the armhole. Also cut off one sleeve.

stella mccartney dress,dress diy,diy,fashion diy,how to,cut out dress,wavy hem,spring 2012
This is how the neckline looks once cut
stella mccartney dress,dress diy,diy,fashion diy,how to,cut out dress,wavy hem,spring 2012

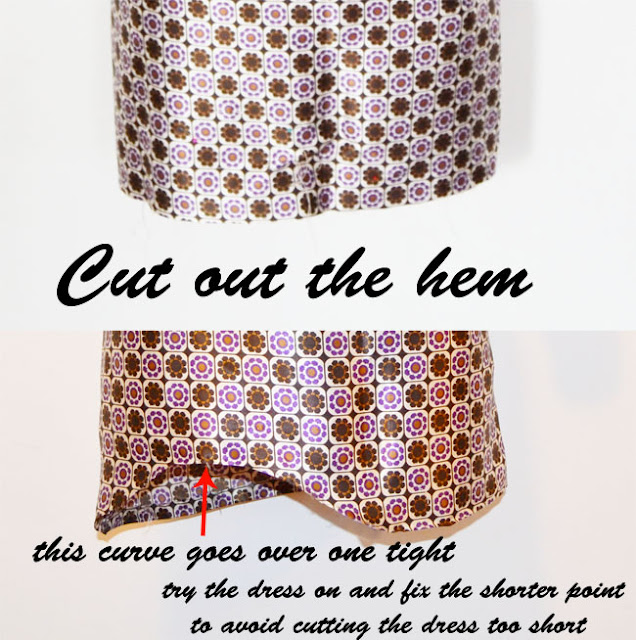
Now let's cut the wavy hem.

stella mccartney dress,dress diy,diy,fashion diy,how to,cut out dress,wavy hem,spring 2012

stella mccartney dress,dress diy,diy,fashion diy,how to,cut out dress,wavy hem,spring 2012
This is how the dress should look once cut
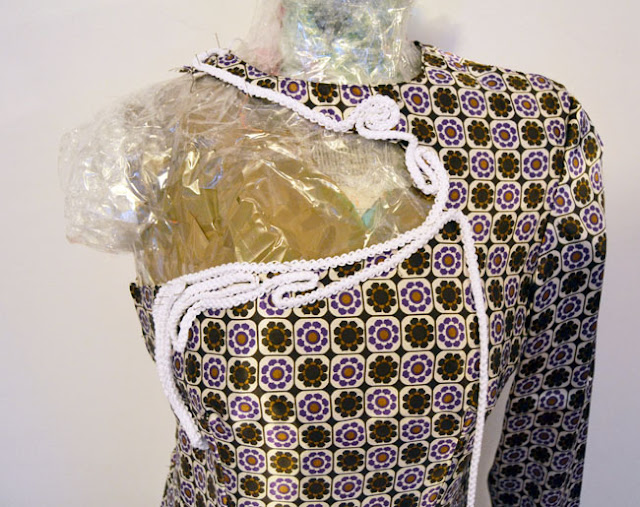
 Now let's decorate it! Stella MCartney's dress is heavy embroidered along the neckline and along the hem. To imitate this embroidery I made a few meters of crochet cord (but you can also buy a cord or a cute trim). This cord is called romanian cord (or european macramè) and it's easy to do if you know the basics of crochet, click on this link to learn how to do the romanian cord.

stella mccartney dress,dress diy,diy,fashion diy,how to,cut out dress,wavy hem,spring 2012
this is how the romanian cord looks like
stella mccartney dress,dress diy,diy,fashion diy,how to,cut out dress,wavy hem,spring 2012
I pinned the cord over the dress then I sewed it
stella mccartney dress,dress diy,diy,fashion diy,how to,cut out dress,wavy hem,spring 2012
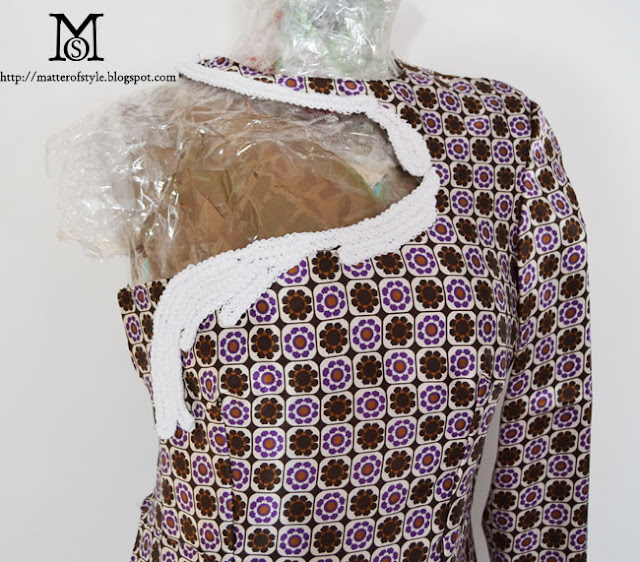
And this is how the embroidery looks like when done.

stella mccartney dress,dress diy,diy,fashion diy,how to,cut out dress,wavy hem,spring 2012

And this is how the dress looks once finished.
I hope you liked this tutorial, happy Sunday!
See other diy cloths here.

Tuesday, January 31, 2012

Vuitton inspired metal peter pan collar

fashion diy,diy,diy peter pan collar, peter pan collar, metal peter pan collar,vuitton peter pan collar, no sew,tutorial

Peter Pan collars are an irresistible DIY. There's only one collar out of our reach, the king of collars, the Vuitton metal peter pan collar. Impossible to DIY. without using metal? No, I found a way to make one similar using some quite strange items : felt, a blow dryer and mirror paper.
Felt it's a very interesting material because it becomes moldable when exposed to heat and keeps the shape when cool. We'll use the blow dryer to shape the felt.
The mirror paper it's a self adhesive stiff paper that looks like mirror, we'll use it to give the metal effect to our collar.
So grab the blow dryer and let's see how I made the collar.

I colletti Peter Pan sono un'irresistibile DIY. Solo uno era rimasto fuori dalla portata di noi ragazze, il re dei colletti, il colletto in metallo Vuitton. Impossibile da riprodurre senza utilizzare il metallo? Invece no, ecco come realizzarne uno simile utilizzando dei curiosi materiali : del feltro, della carta specchio e un phon.
Il feltro è un materiale molto interessante che diventa malleabile quando esposto al calore e mantiene la forma una volta raffreddato. Utilizzeremo quindi il phon per modellarlo. 
La carta specchio è un tipo di carta rigida e adesiva con la superficie riflettente, la useremo per creare l'illusione della superficile metallica.


This is what you need:
fashion diy,diy,diy peter pan collar, peter pan collar, metal peter pan collar,vuitton peter pan collar, no sew,tutorial
get the felt that is sold in stiff sheets or it won't keep the shape
Vi serviranno: un foglio di feltro rigido, un foglio di carta specchio, una cerniera, un phon, della colla
fashion diy,diy,diy peter pan collar, peter pan collar, metal peter pan collar,vuitton peter pan collar, no sew,tutorial
the inspiration Vuitton metal Peter Pan collar
fashion diy,diy,diy peter pan collar, peter pan collar, metal peter pan collar,vuitton peter pan collar, no sew,tutorial
get the pattern here: peter pan collar free pattern

scaricate il modello del colletto peter pan  ritagliate la forma in feltro e incollate la cerniera sul retro
fashion diy,diy,diy peter pan collar, peter pan collar, metal peter pan collar,vuitton peter pan collar, no sew,tutorial
when it's warm lift up the rounded edges and the inner border, let it cool for a second and see it keeping the shape

usate il phon per scaldare il feltro, appena sarà malleabile modellatelo con le mani: alzate il bordi esterni verso l'alto e il bordo interno all'infuori, dategli tridimensionalità
fashion diy,diy,diy peter pan collar, peter pan collar, metal peter pan collar,vuitton peter pan collar, no sew,tutorial
Usando il modello ritagliate la carta specchio
fashion diy,diy,diy peter pan collar, peter pan collar, metal peter pan collar,vuitton peter pan collar, no sew,tutorial
until you get the shape that you want.
To be sure that the felt will keep the shape forever spray it with a sealant.

Incollate la carta specchio sul colletto in feltro e continuate a scaldare il feltro fino ad ottenere la forma desiderata. Alla fine spruzzate con un fissante il feltro per essere sicure che non perda più la forma.

Friday, January 20, 2012

Galaxy nail manicure DIY

galaxy nails,nebula nails,diy nails,diy,how to,tutorial,nails

Today I made this galaxy manicure using only one key item: a sponge! See how I made it!

Ho realizzato questa manicure "spaziale" utilizzando un oggetto molto comune: una spugna! Ecco come utilizzarla!


You can choose  any colour combination you want, only be sure to have a white and a glittered nail polish
Scegliete la combinazione di colori che preferite poi aggiungete uno smalto bianco e uno glitterato
galaxy nails,nebula nails,diy nails,diy,how to,tutorial,nails
 Spennellate la spugna con lo smalto e applicate il colore sulle unghie in modo casuale
galaxy nails,nebula nails,diy nails,diy,how to,tutorial,nails
Ripetete il procedimento con altri colori
Con uno spillo disegnate dei puntini bianchi (le stelle) e terminate stendendo uno strato di smalto glitterato

Tuesday, December 27, 2011

Make a jewelry holder with a box of chocolates

how make jewelry holder,jewelry holder,chocolates box,diy


This is not properly a tutorial it's more a suggestion on how to recycle a box of chocolates turning it into a rings holder. The tough part comes first: you and your friends have to eat all the chocolates then you can insert all your fancy rings into the box so they are clearly on display and you can quickly choose between them.

Quello di oggi non è propriamente un tutorial è più un suggerimento su come riciclare una scatola di cioccolatini trasformandola in un porta gioielli. La parte più difficile sarà sicuramente consumare i cioccolatini ma con l'aiuto di qualche amico ce la potete fare; poi andrete a riempire la scatola con i vostri anelli o anche orecchini così saranno esposti in bella vista e potrete scegliere rapidamente quali indossare.

how make jewelry holder,jewelry holder,chocolates box,diy

Friday, December 2, 2011

How to make earrings with buttons

I needed a pair of earrings to wear with my lion bracelet so I made these, you'll find the tutorial below, I hope you'll like it!

Ho creato questi orecchini da indossare con il mio bracciale animalier, troverete il tutorial di seguito, spero vi piaccia!


you'll need:
2 gold buttons
2 earrings hooks
2 clamps
a pincher
1 meter of cobra chain
gold metallic wire

Vi servono:
2 bottoni dorati
2 ganci per orecchini
2 morse
2 cerchietti di filo metallico
una pinza
1 metro di catenella cobra
filo metallico dorato

 Wrap the wire around the button then make two loops 

Avvolgete il filo metallico intorno al bottone e formate due gancetti 
Using scissors cut the cobra chain in pieces of the same lenght

Usando le forbici tagliate la catenella in segmenti della stessa lunghezza 

Block the chain pieces squeezing the clamp with the pincher

Usando la pinza schiacciate la morsa sulle catenelle

Connect the button to the clamp and to the earring hook with two jump rings.
Connettete il bottone alla morsa e al gancetto per orecchini utilizzando due cerchietti di filo metallico

Tuesday, November 15, 2011

DIY idea: the fox scarf


from left via etsy : fox scarf in felt;   knitted scarf

Fur collars and fox stoles has been in the past symbols of elegance. Nowadays we choose to wear less expensive but still beautiful faux furs leaving animals happily floric in the countryside. If you still feel the urge to wear a fox around your neck why not wear one of the foxes above?
They're funny and make a statement accessories for the fearless fashionista. They can make even wonderful christmas gifts for your friends so start knitting.

 Colli di pelliccia e stole di volpe sono stati sicuramente in passato simboli d'eleganza. Oggi scegliamo di indossare pelliccie ecologie, meno costose ma altrettanto belle lasciando gli animali liberi di scorazzare per la campagna. Se sentite ancora la necessità di indossare una stola di volpe intorno al collo perchè non provare una di quelle che oggi vi propongo? Un accessorio divertente per colei che non ha paura di osare. Potreste realizzare queste divertenti sciarpe anche per le vostre amiche e regalarle per Natale.

Monday, November 7, 2011

Versace inspired bracelet DIY

 Gold and chains are the perfect ingredients for a luxury bracelet. I istantly loved the bracelet designed by Donatella Versace for H&M and while we wait for the collection to finally reach the stores, why don't make our version of it? You only need gold chains, a wide clasp and a big button!

L'oro o almeno il dorato è l'ingrediente indispensabile per un gioiello che abbia un aspetto lussuoso. Tra gli accessori disegnati da Donatella Versace per il marchio H&M uno in particolare mi ha colpito subito ed è il bracciale con le catenelle. Mentre aspettiamo che finalmente la collezione venga distribuita nei negozi ecco un tutorial veloce che reinterpreta il braccialetto. Vi servono: catenelle, una chiusura e un bottone e il bracciale è presto fatto.


the inspiration:Versace fo H&M
 il bracciale Versace for H&M
 
Aren't buttons beautiful? They can make incredible jewellery almost on their own. I found this big gold button at the haberdashery, you can choose any button you like.The variety is almost infinite and you'll be tempted to buy them all.
Here's the list of supply needed: a piece of metallic wire, a gold chain ,a button, a clasp like the ones you see below. They are pretty common but my local shop didn't have it so I had to diy my own with a metallic cap.

I bottoni sono davvero bellissimi e possono diventare dei gioielli unici. Io ho acquistato questo grande bottone dorato, voi scegliete quello che più preferite. La scelta è davvero molto ampia e una volta entrate in merceria sarete tentate di comprarli tutti!
Prendete: un filo metallico, una catenella dorata, un bottone, una chiusura per bracciale come quelle che vedete qui sotto. Il mio negozio di riferimento le aveva finite quindi ho dovuto "fabbricare" la mia con un un tappo di lamiera.


I just laid down the chain and tried the button on: as you can see the bracelet looks already done.
Measure your wrist and cut the chain in pieces of the same lenght; then attach the botton at the center with a piece of metallic wire. Using the pincher press the clasp at the ends to block the chains and you've done!

Ho sistemato la catena sul tavolo e ci ho poggiato sopra il bottone. Come potete vedere il bracciale sembra già fatto! Misurate il polso e tagliate la catenella in pezzi della stessa lunghezza. Legate il bottone alla catenella con un pezzo di filo metallico. Inserite la chiusura e schiacciatelasulle catenella. Avete finito!


what i did to make the clasp: I cut 2 rectangular pieces from the cap then I pierced it using a nail. I used a hook  to connect the chain to the metallic plate an then i pressed it down using a pincher.
Come ho fatto a far la chiusura? Ho ritagliato due rettangoli dal tappo e li ho bucati usando un chiodo. Con dei gancetti ho connesso la lamiera alle catenelle e ho poi schiacciato la lamiera con la pinza.

Saturday, October 22, 2011

Versace inspired jeans DIY

DIY jeans
white altered blouse (a diy in progress)

I've been dreaming about a micro studded cloth for a while but the idea of inserting each mini stud by hand was just unrealizable until I found these "beads in a bottle" (doesn't it sound like something came out from Wonderland?). It's a gummy product you can squeeze onto fabric and that makes a ball that looks like a bead.  I found my "micro studding machine"! I picked the metal colors series and I started "to stud" a pair of black jeans. The inspiration is Versace. I decorated them around the lateral seam with the greek fret then I added a spiral on the front.

Ho sempre desiderato possedere un abito decorato con mini borchie ma l'idea di applicarle manualmente una ad una era semplicemente non realizzabile fino a quando ho trovato una ragionevole alternativa: perline in bottiglia (dal nome sembra un oggetto proveniente dal paese delle meraviglie). E' un prodotto viscoso che può essere applicato sulla stoffa e forma una pallina dall'aspetto di una perlina: una perfetta "macchina borchiatrice"! Ho scelto il prodotto in colori metallici affinchè la perlina sembrasse una borchia. L'ispirazione è Versace, ho decorato i pantaloni con una greca intorno alla cucitura laterale e ho aggiunto dei decori sul davanti.


a life size view of the pattern I drew, the grid step is 1 cm wide
il disegno della greca, il quadretto è largo 1 cm
I drew the pattern onto the trousers with a chalk
ho disegnato la greca sul pantalone con un gessetto
the studding machine gun is armed
 la "borchiatrice" armata e carica
 the first studs
le prime borchie
the spiral: finished and dried
la spirale finita ed asciutta

If you want to decorate smaller areas rhinestuds are a good alternative to "beads in a bottle". They are small metallic studs that can be ironed onto the fabric, you can buy ready to use decorations or loose ones.

Se volete decorare aree più piccole le borchiette piatte sono una valida alternativa alle "perline in bottiglia" . Si incollano sulla stoffa stirandole e si possono acquistare in merceria interi decori già pronti o sfuse.

A special thanks to Beth Livesay and Stampington for sending me a bag full of these special beads for my fashion experiments. Visit Beth's blog: Couture over Coffee

Un ringraziamento particolare a Beth Livesay e a Stampington per avermi mandato un pacchetto pieno di "perline in bottiglia" per i miei esperimenti di moda. Visitate il blog di Beth: Couture over Coffee.

my stock of liquid beads, still plenty left for my future projects