Showing posts with label how to tutorial. Show all posts

Saturday, October 29, 2011

Cut out shirt tutorial


Here's the shirt tutorial. I took a real man shirt and then I pinched and pinned it around the waist to make it more fitted. You can choose any shirt and then follow the 3 steps to cut it out.

Come promesso ecco il tutorial per realizzare la camicia con inserti in tulle. Io ho traformato una vera camicia da uomo e ho creato due pence sul davanti per renderla più avvitata. Voi scegliete la camicia che più preferite e seguite i 3 step per trasformarla.


Wear you shirt and mark out with a pin where you want the see throught part to begin. Lay down your shirt and make a loose stitched  line that will help you to cut straight.

Indossate la camicia e appuntate uno spillo sul davanti per segnare il punto da cui iniziare a tagliare. Partendo da lì fate un'impuntura da parte a parte che vi aiuterà a tagliare dritto.

 Cut the shirt : start from the front, go around the shoulder and down to the botton line. Leave 1 cm of fabric around the edge and then fold that edge to obtain a neat border.

Tagliate la camicia: cominciate dal davanti, proseguite intorno alla spalla e poi tornate giù intorno la linea dei bottoni. Ricordatevi di lasciare un 1 cm di stoffa intorno all'area tagliata. In un secondo momento piegate quel bordo ottenendo così un orlo ben rifinito.


Reverse the shirt.
Take your light weighted tulle and pin it over the edge of the cut part.
The good thing is that you don't need any pattern, just pin the tulle on and pay attention that the tulle is well stretched out.
Now sew the tulle on the shirt, cut the excess tulle around the edge and you've done!


Mettete la camicia a rovescio.
Prendete un tulle molto leggero e appuntatelo con degli spilli sulla parte tagliata.
Non vi servirà alcun modello fate solo attenzione che il tulle sia ben steso così non farà pieghe.
Cucite il tulle sulla camicia e tagliate quello  in eccesso ai bordi e avete finito!

Friday, October 28, 2011

Man shirt makeover


Many winter looks are inspired by men style. What better than a classic man shirt to jump on seasonal trends? I spent this week examining minutely this piece of wardrobe and at the end I couldn't resist giving  it my own twist. There are many beautiful details in a man shirt: the stiff collar and cuffs,the button line so I thought it would be cool to emphasize these details and make them pop out of the shirt.  I cut out a piece from the front of the shirt and I subsituted it with a very light weighted tulle. I think I obtained a masculine look with a feminine twist, what do you think of the result? Tomorrow the tutorial!

Read the Cut out shirt tutorial now


La moda invernale si ispira al guardaroba maschile. E come non scegliere una camicia classica per interpretare il trend di stagione? Tanti sono i dettagli che rendono speciale la camicia : il colletto rigido, il bordo con i bottoni allora perchè non metterli in evidenza e farli risaltare? Ho ritagliato parte della camicia e ho sostituito il cotone con del tulle leggerissimo ottenendo così un effetto trasparenza che rende il look si androgino ma con un twist femminile. Che ne pensate? Tornate domani per il tutorial!

Tuesday, September 27, 2011

DIY idea: open back blazer

 via Vogue

A boring blazer,a pair of scissors and lots of beads are the ingredients to copy this look from Berlin: a city that always inspires for clean and young designs.

Un blazer di cui vi siete stancate, un paio di forbici e molte perline sono gli ingredienti per replicare questo look che arriva direttamente da Berlino:una città che ispira per il design dalle linee semplici e giovani.

Tuesday, September 13, 2011

Bananas bag DIY

I think that the Prada banana print looks like the bananas are popping out of the fabric so I wanted to make this effect real and I decided to do a fun bag with "banana fringes".

 Guardando la stampa di Prada,le banane sembrano proprio venir fuori dalla stoffa! Ho deciso divertirmi a rendere questo effetto reale e a confezionare una borsetta con le banane a mo di frange.


 the inspiration:Prada banana skirt
l'ispirazione: la gonna di Prada
I used an heavy yellow cotton,fabric pen,scissors,adhesive canvas,wooden beads
Cotone pesante,penna per la stoffa, forbici,telina adesiva,perline in legno

On the back of the fabric I've ironed an adhesive fabric so the cotton won't unthread
Ho incollato con il ferro della telina adesiva così il cotone non sfilerà
I've cut many pieces of cotton in the shape of bananas
A questo punto ho tagliato tanti pezzi di cotone dalla forma di banana
I used a fabric pen to draw the outline
Ho tracciato i contorni con una penna per la stoffa

I've cut the bag in a "fish bowl" shape and I've pinned onto it all the bananas
Ho deciso di dare alla borsa una forma arrotondata e ci ho appuntato con degli spilli tutte le banane

I've used a few big wooden beads to make the handle.
Alla fine ho usato delle perline in legno molto grandi per realizzare il manico della borsa.

Saturday, July 9, 2011

Versace dress DIY


 when the dress has a complicated neckline a necklace can be distracting but you can make it swing on the back
quando un vestito ha un scollo importante una collana può essere di troppo, allora perchè non farla dondolare sulla schiena?

 DIY dress and bag
H&M belt and ring
ASOS necklace 
Atmosphere shoes


 the inspiration

This is the dress i made inspired by the feathered Versace one. Its shape is basic, i put all the effort in making the necklice with satin fabric. I'll show you how to make a band of  fabric that turn. Meanwhile what do you think of the dress?

Questo è il vestito che ho realizzato ispirandomi a quello di piume di Versace. Il modello base è semplice,la difficoltà sta nello scollo fatto in raso. Vi mostrerò come ho realizzato la striscia di stoffa "che gira" dietro al collo. Nel frattempo che ne pensate del vestito? 

SEE THE MAKING

Saturday, June 4, 2011

The straw bag DIY tutorial

to see more pics of the finished bag click here
per vedere altre foto della borsa finita cliccate qui

you'll need:
  • the straw placemats as a base
  • satin ribbons to decorate the flap
  • gros grain ribbon
  • beads and sequins
  • silver thread
  • 2 meters of chain to make the strap
  • eyelets

avrete bisogno di:
  • tovagliette americane di paglia
  • nastro di raso per decorare la pattina
  • grosgrain
  • perline e paiettes
  • filo argentato
  • 2 metri di catena dorata per la tracolla
  • occhielli

the pattern,click on the images to see them bigger.
il modello, cliccate per vederlo più grande

Sew all the pieces leaving the fringes on the outside
cucite tutti i pezzi lasciando sporgere le frangie

i've boughts some meters of satin ribbons to decorate the flap, this way it will shine under the light
i've chosen 2 different tones of blue and then a shiny silver one

ho comprato qualche metro di nastrini di raso per decorare la pattina ho scelto due tonalità di celeste e un filo argentato
i've weaved the silk ribbon into the straw flap with the help of a pin used as a replacement of the needle;i've alterned the colors.
Then i've added the silver ribbon onto the body of the bag and sides too.

Ho intrecciato il filo nella trama della borsa con l'aiuto di uno spillo che sostituisce l'ago
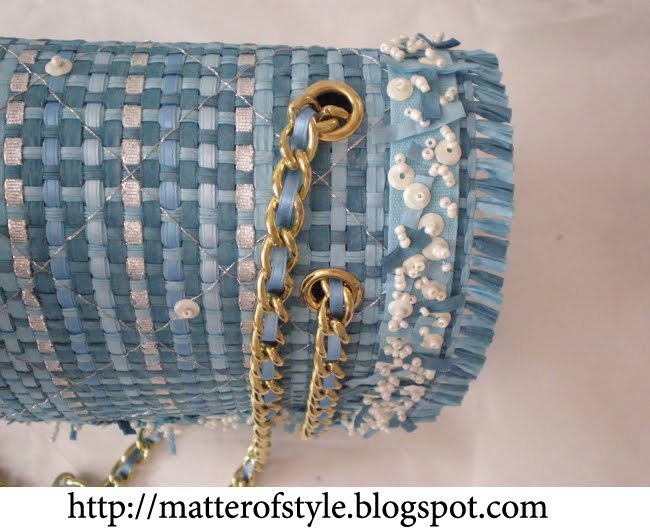
In this pic you can see the different ribbons inserted into the texture of the flap.
To keep every ribbon in place i've handstitched a quilted pattern with a silver shiny thread and i've added some random beads.

qui potete vedere i nastrini inseriti nella paglia.
Per tenere tutti i nastri al loro posto ho ricamato a mano una trapunta con il filo argentato e ho aggiunto qualche perlina qua e là


now to add more details i've used a gros grain ribbon and i've handstiched onto it some beads and sequins and little pieces cut from the placemats with the silver thread.
Then i've placed the gros grain border onto the flap of the bag.

per aggiungere ulteriori dettagli ho decorato un nastro di gros grain con perline e paiettes e piccoli pezzettini di paglia,ho cucito il bordo di gros grain sul davanti


the flap almost finished
now it's time to put the bag together, i've sewn the flap onto the body of the bag then i've added the eyelets needed to add the chain strap.

per mettere insieme la borsa infine bisogna cucire la pattina sul corpo della borsa,aggiungere gli occhielli per attaccare la tracolla

then i've weaved a blue satin ribbon into the chain strap and the bag it's finished!
This bag required a lot of work but as you can see its beauty it's all in the details.

Ho intrecciato un filo di raso anche nella catenella e la borsa è finalmente finita.
Questa borsa ha richiesto molto lavoro ma come potete vedere sono proprio i dettagli a renderla preziosa.

Sunday, May 29, 2011

DIY inspiration: 2 colors blouse


Two blouses to make one. It's a different look very easy to obtain. Take two blouses in different colors and cut the back in half. Sew together the back again after mixing the colors.


Il mix di due camicette di due colori diversi. Semplicissima da realizzare basta tagliarle a metà al centro dietro e rifare la cucitura dopo aver mischiato le metà!

Monday, May 23, 2011

Candy neon bag DIY tutorial


https://blogger.googleusercontent.com/img/b/R29vZ2xl/AVvXsEhxQXpWZAn5a6IRGNSc3yVsFxqrxRXUxJwAdbIR_EANBFE8yogOLpMlJ-CL3DNqmKOTwoHjliQEApM0OpgOrTWEGxRTEmFKTWahFWtGeFxfPX5ntowgGzNOaaX0h-szGIscoVzmkabMdZc/s1600/1.jpg


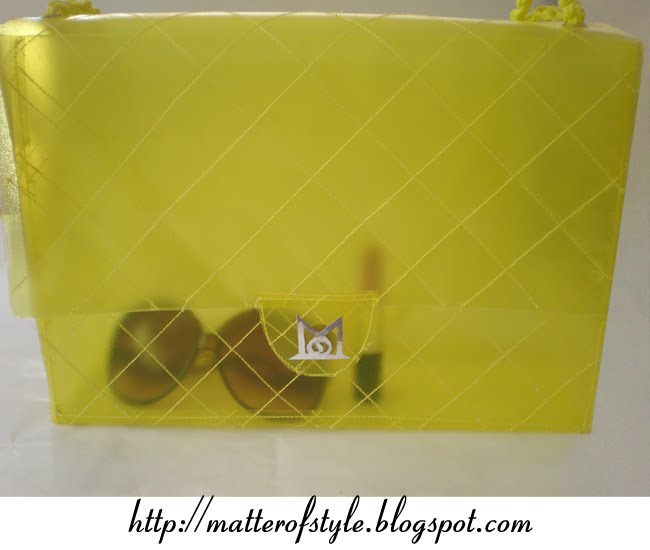
I'm really happy you liked the bag and as promised here's the pattern. The raw materials i've used (you all went very close to the answer) are book covers. I've chosen these because i had hard times finding the yellow plastic so i ended searching for it in a office supply store.
Once i got these as material i've decided take advantage from the dimensions of the covers and reduce the plastic waste crafting a "A4" bag,this way you'll reduce the number of cuts needed.

To make the bag you'll need:
  • 3 book covers
  • a magnetic button
  • 4 eyelets
  • a rope to make the handles

  • You'll use the first cover to make the back and the flap of the bag.
  • Cut the second one in half to obtain the front of the bag and then cut the bottom.
  • Use the third to cut the 2 sides of the bag.
  • sew all the pieces together
  • cut 2 semicular shapes
  • attach one side of the magnetic button in the middle of one of these and then sew them one onto another
  • sew the piece at the center of the flap.
  • attach the other side of the magnetic button on the front of the bag
  • add 4 eyelets at the top of the flap
  • the handle can be a simple rope you'll insert into the eyelets;mine it's made with a simple crochet chain stitch
  • and you've done! :)

Sunday, May 22, 2011

Candy neon bag DIY


Jelly plastic bags have been in my shopping list for a while, so i've decided to make my own and here's the result, i've chosen a very classic design,The design,the flap bag who has been so well interpreted by Chanel and i've tried to give some personality to the plastic quilting it.
Tomorrow i'll get back to you with the dimension of the bag if you want to make your own,in the meantime,if you want to play with me here's a little question for you: what common item i've used as raw material for this bag? I hope you had a nice weekend! :)

Check out the tutorial here


La borsetta in plastica colorata è nella mia lista dei desideri da un po' così ho deciso di cucirne una ed ecco a voi il risultato! Ho scelto un modello molto classico, anzi Il modello che si ispira a Chanel nella trapuntatura. Domani vi darò lo schema se vorrete cucine una tutta vostra ma nel frattempo se volete indovinate che oggetto comune ho utilizzato come materia prima per la borsa! Spero che abbiate tutti trascorso un buon weekend!